
Every product image on your website is a silent promise to your customer. A poorly retouched photo—with soft shadows, inconsistent colors, or a distracting background—breaks that trust before a single word is read. Conversely, a meticulously retouched image drives clicks, reduces returns, and strengthens your brand equity across every channel, from Amazon to Shopify to print catalogs.
This comprehensive product photo retouching checklist is organized by category and retouching stage to help you deliver consistent, marketplace-ready results. Whether you edit in-house or outsource to a professional team, this guide covers what to look for, why it matters, and what “good” output looks like.
Who This Checklist Is For
This guide is a valuable resource for:
- eCommerce Sellers on Amazon, Shopify, eBay, Etsy, and Walmart Marketplace.
- Product Photographers who deliver edited files to clients.
- Brand Managers and Creative Directors overseeing photography pipelines.
- Photo Editing Studios managing high-volume retouching workflows.
- Freelance Retouchers seeking a structured quality-control framework.
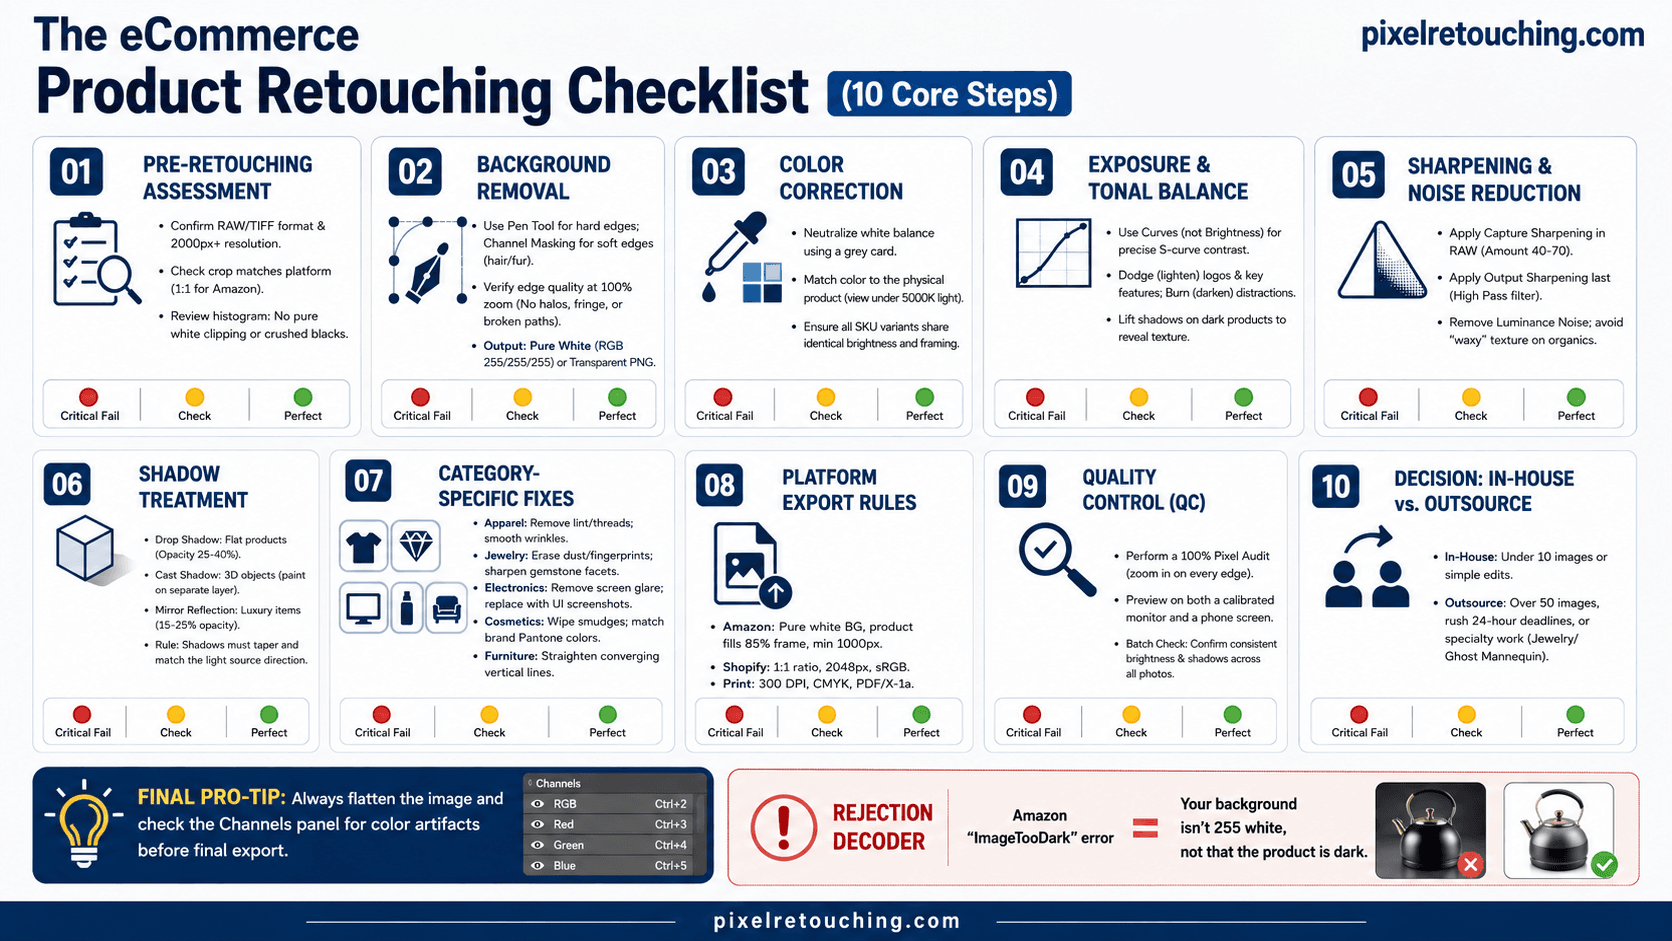
1. Pre-Retouching Assessment
Before you open a single adjustment layer, you must evaluate the raw image file. Poor inputs create compounded problems downstream; fixing a flawed capture in post-production is significantly more expensive than reshooting.
1.1 File & Format Check
- File Format: Confirm the source file is a RAW, TIFF, or high-resolution JPEG (minimum 300 DPI for print; 72–96 DPI for web is acceptable if pixel dimensions are sufficient).
- Resolution: Verify that image resolution meets platform specifications. Amazon requires a minimum of 1000px on the longest side; 2000px+ is recommended for zoom functionality.
- Color Space: Use sRGB for web/eCommerce output; Adobe RGB or ProPhoto RGB for print workflows.
- Technical Issues: Flag any motion blur, camera shake, or focus issues that cannot be corrected in post.
- Dynamic Range: For RAW files, ensure shadow and highlight detail are recoverable.
1.2 Composition & Cropping Review
- Product Positioning: Verify the product is centered (or intentionally off-center for brand style guides).
- Aspect Ratio: Check that the crop ratio matches target platform requirements (e.g., 1:1 for Amazon, 4:5 for Instagram, 16:9 for banner ads).
- Negative Space: Ensure sufficient negative space exists for platform-required white space.
- Clutter: Identify any unwanted props, hands, or staging elements that need removal.
1.3 Exposure Baseline
- Histogram: Review the histogram to ensure there are no pure whites (clipped highlights) unless you are intentionally shooting an isolated white product.
- Shadow Detail: Confirm that shadow detail is present. Crushed blacks will lose texture information on fabrics, leather, and dark-colored products.
- Lighting: Flag mixed lighting sources (e.g., daylight + tungsten) that require white balance correction.
2. Background Removal & Isolation
Background removal is the foundational step in product photo retouching. The precision of this step determines the quality of every subsequent edit and controls how naturally the product sits in its final context.
2.1 Subject Isolation Quality
- Hard Edges (Electronics, Ceramics, Metal): Use the pen tool or a clipping path for pixel-perfect isolation with no fringe or aliasing.
- Soft Edges (Hair, Fur, Fabric): Use channel masking or luminosity masking; never use a hard clipping path for these subjects.
- Transparent Objects (Glass, Acrylic): Retain refraction and internal highlights; avoid rendering transparent areas as opaque white or grey.
- Fine Detail: Zoom to 100% and inspect all edge pixels. Confirm there are no halo artifacts, residual background color, or broken paths.
- Anchor Points: Check the density of anchor points on curved objects. Too few points create faceted edges; too many create over-tightened curves.
Platform Rule: Amazon’s main product image requires a pure white background (RGB 255,255,255) with the product occupying at least 85% of the image area. Any visible shadow, gradient, or texture will fail their automated image quality check.
2.2 Background Output Standards
- Pure White: Confirm output RGB values read 255/255/255 across the entire background area—not near-white (253/253/253).
- Transparent (PNG): Confirm there are no residual semi-transparent pixels around the subject edge.
- Custom Background: Verify color continuity, consistent lighting direction, and no edge-lighting mismatch between the subject and the new background.
3. Color Correction & Consistency
Color accuracy is arguably the most commercially significant retouching variable. Studies consistently show that product color discrepancies are among the top three reasons for online returns. A rigorous color correction workflow protects your brand reputation and your return rate.
3.1 White Balance & Neutral Correction
- Set White Balance: Use a known neutral in the scene (e.g., a grey card or product packaging) for accurate white balance.
- Neutralize Casts: Remove any green/magenta cast from fluorescent studio lighting.
- Global Neutrals: White areas should read R=G=B (within ±3 values for acceptable tolerance).
- Shadow Cast: Check for color casts in shadows separately from highlights; they often require independent correction.
3.2 True-to-Life Product Color
- Match Physical Product: Review the retouched image against the physical product in controlled 5000K (D50) or 6500K (D65) lighting.
- HSL Verification: Ensure Hue, Saturation, and Lightness values are not pushed beyond what the physical product displays.
- Selective Color: Check skin tones or fabric color rendering, avoiding artificial oversaturation of reds or yellows.
- Multi-SKU Consistency: Use a consistent color correction recipe across all product color variants.
3.3 Color Variant Consistency
- Match Lighting and Framing: All variants must share identical lighting, shadow, and crop framing; only the product color should differ.
- Non-Destructive Edits: Use Smart Objects or virtual copies to maintain non-destructive variant edits.
- Brand Color Matching: Confirm brand PMS/HEX color values are matched for any branded colorways.
4. Exposure, Contrast & Tonal Balance
Tonal balance determines whether your product photograph reads as professional and trustworthy or flat and amateurish.
4.1 Global Exposure Adjustments
- Adjust Exposure: Tweak the overall exposure so the product is optimally bright without highlight clipping.
- Use Curves: Use Curves (not just Brightness/Contrast) for precise tonal control. S-curve adjustments improve perceived contrast while preserving midtone detail.
- Highlight Recovery: Apply Highlight Recovery to restore blown-out areas in specular reflections on metal and glass.
- Lift Shadows: Lift shadow detail on dark-toned products (e.g., black apparel) so that texture is visible.
4.2 Local Exposure & Dodging/Burning
- Dodging: Lighten areas that should draw the viewer’s eye, such as the brand logo or a key design element.
- Burning: Darken competing elements like edges, irrelevant details, or busy backgrounds.
- Luminosity Masks: Use luminosity masks for local corrections; never paint directly on the Background layer.
- Check for Color Shifts: Verify that dodge/burn passes do not introduce color shifts.
5. Sharpening, Detail & Texture Enhancement
Sharpening is output-dependent: what looks correct for a web image will appear over-processed at print size. Always apply sharpening as the final destructive step, calibrating it to the specific output medium.
5.1 Capture Sharpening (RAW Files)
- Input Sharpening: In Camera Raw or Lightroom, apply subtle input sharpening (Amount 40–70, Radius 0.8–1.2).
- Masking: Use the Masking slider (Alt/Option-drag) to restrict sharpening to edges only, preventing texture noise from being sharpened in smooth areas.
5.2 Creative / Output Sharpening
- Non-Destructive Sharpening: Apply High Pass or Smart Sharpen non-destructively on a stamped layer.
- Textured Products: For products like fabric or wood, use the Texture and Clarity sliders to enhance surface micro-detail.
- Smooth Products: For cosmetics or ceramics, reduce sharpening to avoid emphasizing micro-scratches or imperfections.
- Mask Sharpening: Do not apply sharpening to background-only areas; always mask to the subject.
5.3 Noise Reduction
- Luminance Noise: Remove luminance noise from ISO 800+ captures without softening critical edge detail.
- Color Noise: Remove color (chroma) noise globally.
- Check for Artifacts: Verify that noise reduction has not created a “waxy” or “plastic” appearance on organic products.
6. Shadow & Reflection Treatment
Natural-looking shadows are what separate amateur product composites from professional ones. They anchor the product visually and communicate weight and form.
6.1 Shadow Types & Applications
- Drop Shadow: Best for flat-lay products, packaging, and books. (Offset: 3–8px; Softness: 12–20px; Opacity: 25–40%).
- Cast Shadow: Use for objects on a surface. Paint on a separate layer and use Gaussian blur with a gradient mask.
- Natural Shadow: Retain the original shadow from studio photography but replace the background.
- Reflection Shadow: Perfect for luxury products, cosmetics, and electronics. Mirror the product at 15–25% opacity, compressed vertically.
- Floating Shadow: Ideal for hero shots and lifestyle composites. Use an elliptical gradient below the product.
6.2 Shadow Quality Checks
- Consistent Direction: The shadow must fall in a physically consistent direction relative to the implied light source.
- Varying Softness: Shadow edge softness should increase with distance from the object (hard contact, soft extremity).
- Color Temperature: Shadow color should not be pure black; it should carry a subtle tint from the environment.
- Varying Opacity: Shadow opacity should taper as it extends from the product.
7. Category-Specific Retouching Standards
Different product categories have distinct retouching requirements. Complete the general checklist (Sections 1–6) first, then apply the relevant standards below.
7A. Apparel & Fashion
- Remove all lint, loose threads, and fabric pills.
- Smooth wrinkles and creases while preserving intentional texture (e.g., denim weave, cable-knit).
- Correct mannequin shadows on the neck, sleeves, and waistband.
- For ghost mannequin effects, ensure a seamless neck join, symmetric sleeve alignment, and a continuous garment silhouette.
- Check for color banding in gradient-dyed fabrics, ensuring smooth tonal transitions.
7B. Jewelry & Fine Accessories
- Remove all dust, fingerprints, and contact marks at 200–400% zoom.
- Enhance metallic luster: gold should glow warm; silver/platinum should read cool and crisp.
- Sharpen facet edges on diamonds and gemstones; each facet should have a distinct edge.
- Add sparkle highlights on gemstone table facets if not present in the capture.
- Remove any surface scratches or micro-imperfections from metal bands and settings.
- Verify that prong shadows do not obscure the center stone.
7C. Electronics & Hard Goods
- Remove all screen glare and lens flare from product surfaces.
- Neutralize studio reflections visible in screens and glossy chassis.
- Replace screens with appropriate UI screenshots or lifestyle imagery, maintaining perspective.
- Remove all stickers, certification marks, and barcode labels unless required.
- Confirm cable and connector ends are sharp and in focus.
7D. Cosmetics & Beauty Products
- Remove all smudges and fingerprints from glass and glossy plastic packaging.
- Ensure label text is sharp, correctly oriented, and fully legible.
- For open-cap or swatch shots, ensure product texture (cream, powder, liquid) reads accurately.
- Neutralize any packaging color cast from studio lighting; match brand Pantone/HEX colors.
7E. Furniture & Home Goods
- Remove all dust, scratches, and surface imperfections from wood, glass, and upholstery.
- Straighten any converging vertical lines from wide-angle lens distortion.
- Remove visible cables, labels, and staging props from room-set photography.
- Ensure wood grain direction and upholstery texture are consistent across multiple product angles.
8. Platform-Specific Export Requirements
Even a perfectly retouched image can fail a marketplace review if it doesn’t meet technical specifications.
8.1 Key Platform Specifications
- Amazon (Main Image): Pure white BG (RGB 255/255/255); product fills ≥85% frame; JPEG/TIFF/PNG; min 1000px long edge; max 10MB.
- Shopify: Square format (1:1) recommended; 2048×2048px optimal; sRGB; JPEG or WebP.
- eBay: White or light grey BG; min 500px; no watermarks, text, or borders.
- Etsy: 2000px minimum; lifestyle images supported.
- Print Catalog: 300 DPI; CMYK color space; bleed area for full-bleed layouts; PDF/X-1a or TIFF output.
- Google Shopping: White or light BG preferred; min 250×250px; no promotional text.
9. Quality Control & Final Review Protocol
Quality control should be a structured process, not a casual final glance.
9.1 The 100% Pixel Audit
- Pan across the full image at 100% zoom to check every edge, corner, and transition zone.
- Toggle layer visibility to verify all adjustments are applied correctly.
- Check the Channels panel for any unexpected color artifacts or channel misalignment.
- Flatten and inspect the merged image; composite errors are often only visible at full resolution.
9.2 Cross-Device Preview
- View the final image on a calibrated monitor AND an uncalibrated display (laptop, phone) to assess real-world rendering.
- Confirm the image doesn’t appear over-sharpened or over-contrasted on consumer displays.
- Ensure light-toned products don’t blow out or appear grey on high-brightness screens.
9.3 Batch Consistency Review
- Compare all images in a product set simultaneously using a contact sheet view.
- Confirm consistent brightness and white point across the set.
- Verify uniform crop framing and subject scale.
- Check that shadows are consistent in direction, softness, and opacity across the full batch.
9.4 File Delivery Checklist
- Correct file format (JPEG for web, TIFF for print, PNG for transparency).
- Correct DPI embedded in file metadata (72 DPI for web, 300 DPI for print).
- File naming convention matches client specification or platform requirements.
- Color profile embedded (sRGB for web; CMYK or Adobe RGB for print).
- File sizes are within platform limits; compress JPEG to 75–85% for web.
10. When to Retouch In-House vs. When to Outsource
The decision to retouch in-house or outsource depends on volume, complexity, and turnaround time.
| Scenario | Recommended Approach |
| 1–10 images, simple edits | In-house with basic tools (Canva, Remove.bg). |
| 10–50 images, standard editing | In-house if Photoshop-proficient; outsource to recover editor time. |
| 50–500+ images, compliance required | Outsource to a professional retouching service with volume workflows. |
| Specialty retouching (jewelry, ghost mannequin, high-end beauty) | Outsource; requires category-specific expertise. |
| Recurring monthly volumes | Outsource on a retainer model for predictable turnaround and pricing. |
| Rush turnaround (24 hours or less) | Outsource to a team with night-shift capacity. |
Summary:
A product photo retouching checklist is not a luxury—it is a quality control mechanism that protects revenue, reduces platform rejections, and delivers a consistent visual brand identity. By following the workflow outlined here—from pre-shoot file assessment through platform-specific export—you can ensure every product image meets the high standards of today’s eCommerce landscape.
For high-volume or specialty retouching needs where internal capacity is the limiting factor, professional outsourcing services can deliver consistent, compliant results at per-image rates that scale cost-effectively with your catalog.