Both RawTherapee and Darktable are the undisputed kings of free, open-source RAW photo editing. If you’ve been paying for Adobe’s monthly subscription and started questioning whether it’s worth it, these two tools are probably already on your radar. But here’s the problem most comparison articles skip: they describe the features without telling you which tool actually fits your workflow.
After hands-on time with both editors across real editing scenarios — from high-volume portrait sessions to demanding landscape work — here’s an honest, experience-backed breakdown.
What These Tools Actually Are (And What They’re Not)
Before diving into a feature-by-feature teardown, it’s worth being clear on what each application is trying to be, because they solve different problems.
Darktable is a complete, database-driven photo management and editing suite. Think of it as an open-source Lightroom replacement — not just an editor, but a full photo lab. It imports your images into a catalog, manages your library with tags, ratings, and metadata, and lets you edit non-destructively with a powerful modular system.
RawTherapee is a pure RAW developer. It doesn’t import files into a database or manage a library. You open your file system like a browser, pick an image, and edit it with extraordinary precision. That’s its entire mission — and it excels at it.
Understanding this distinction alone will save you hours of frustration.
Quick Comparison: RawTherapee vs Darktable Side by Side
Quick comparison table between RawTherapee and Darktable across key categories, including workflow, masking, color tools, noise reduction, performance, and best fit.
| Features | RawTherapee | Darktable |
|---|---|---|
| Workflow | File browser — no import needed, folder-based | Database catalog — imports into a library like Lightroom |
| Interface | Utilitarian, panel-heavy, logical layout | Modern, modular — steeper initial learning curve |
| Local adjustments | Very limited — no traditional masking | Powerful drawn + parametric masks across all modules. advantage |
| Color science | Precise L*a*b*, HSV, auto-matched tone curve. advantage | Scene-referred filmic rgb, CAT16 color calibration |
| Noise reduction | Wavelets — frequency-layer control. advantage | Profiled denoise — automatic, camera-aware, easy to use |
| Sharpening | RL deconvolution, capture sharpening, USM. advantage | Standard sharpening modules |
| Demosaicing | AMaZE, VNG4, LMMSE + more. advantage | Fewer options, generally sufficient |
| Lens correction | Adobe LCP profiles supported . advantage | lensfun library — calibrate your own if missing |
| Performance | CPU-based — good on older/low-GPU hardware | GPU-accelerated (OpenCL) — fast on modern systems. advantage |
| Library mgmt | None — folder structure only | Tags, ratings, collections, instant search. advantage |
| CR3 support | Limited (Canon R-series issue) | Better CR3 support. advantage |
| Learning curve | Moderate — logical but dense | Steep — requires tutorials and time |
| Best for | Precision RAW development, detail work, older hardware | Full Lightroom replacement, local edits, library workflows |
| Price | Free & open source | Free & open source |
Read Also: RapidRAW vs darktable: Which Free RAW Editor Wins?
Interface and Workflow: Two Different Philosophies
Darktable’s Lighttable Approach
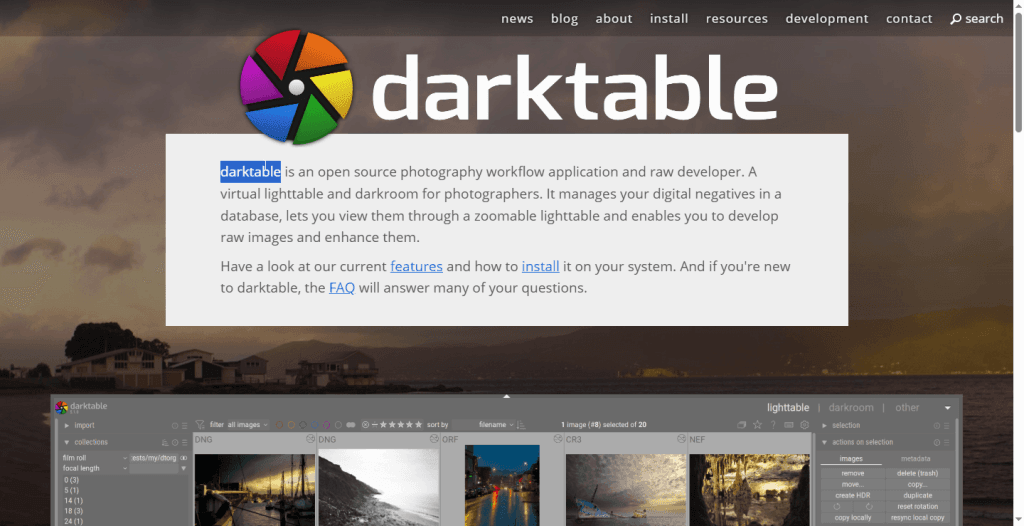
When you first launch Darktable, you’re greeted by the “lighttable” — a grid view of your imported images. This database-driven approach means Darktable tracks every image you bring in, remembers your edit history, applies collections and filters, and lets you locate specific shots within seconds using tags, star ratings, or color labels.
The editing interface uses a modular pipeline, where each effect is a discrete “module” you stack and reorder. This is powerful, but it’s also where Darktable’s learning curve bites hardest. The sheer number of modules — filmic rgb, color calibration, tone equalizer, exposure, haze removal, and dozens more — can feel overwhelming. The interface is modern and GPU-accelerated, but it takes genuine investment to master it. Expect to spend time with documentation and tutorials before this tool clicks.
RawTherapee’s File Browser Model
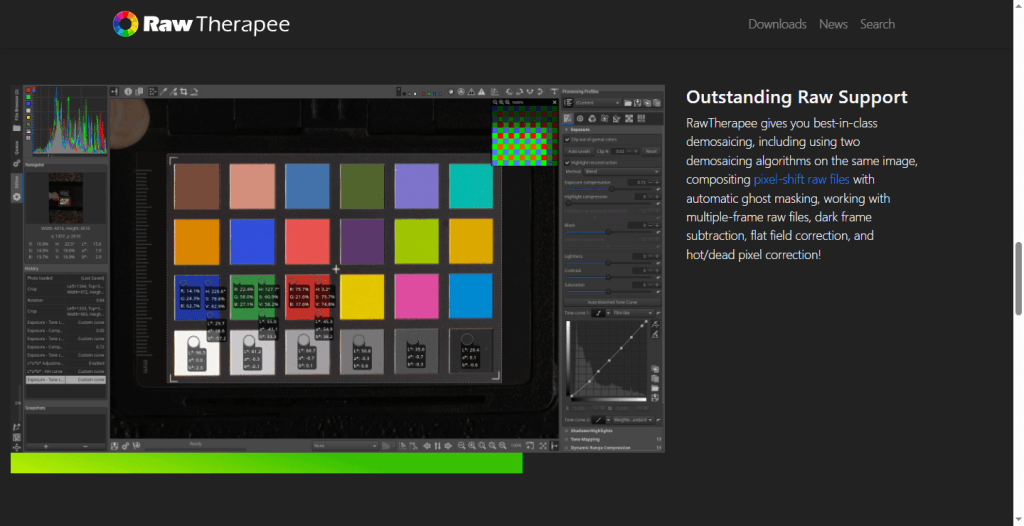
RawTherapee works more like a traditional file browser. There’s no library import step — you navigate to a folder, click a RAW file, and start editing. For photographers who maintain a well-organized folder structure and want to start working immediately without setup friction, this is genuinely freeing.
The interface is panel-heavy, with deep toolsets arranged into tabs: Exposure, Detail, Color, Transform, Raw, and Metadata. Visually, it feels like software from an earlier era — some describe it as utilitarian, others as cluttered. But once you spend time inside it, the layout reveals a certain logical order. Every tool is where you’d expect it to be, and you can collapse what you don’t need. The learning curve is real, but it rewards precision-focused photographers who want granular control.
Editing Capabilities: Where Each Tool Shines
Local Adjustments and Masking — Darktable Wins Decisively
This is arguably the single most important functional difference between the two editors.
Darktable offers a fully featured masking system — drawn masks, parametric masks, and combinations of both. You can isolate a sky, target shadows in a specific tonal range, or apply a radial gradient to a subject. These local adjustments work across virtually every module in the pipeline. For portrait retouchers, architectural photographers, or anyone doing heavy creative edits, this is indispensable.
RawTherapee has no traditional masking or selective editing. It does offer some localized tools — spot removal and limited local lab adjustments — but it’s not comparable to Darktable’s masking depth. If targeted, non-destructive local edits are central to your workflow, this alone may make Darktable the clear choice.
Color Science and Tone Management
Both tools take color management seriously, but they approach it differently.
Darktable’s modern “scene-referred” workflow, built around the filmic rgb module, is designed for wide dynamic range editing and HDR displays. Combined with the color calibration module (which uses a professional CAT16 chromatic adaptation transform), Darktable handles complex lighting scenarios, mixed color temperatures, and tricky exposures with sophistication. Photographers coming from a commercial or fine art background who understand color theory will find Darktable’s pipeline deeply satisfying.
RawTherapee’s color tools are similarly advanced, with support for L*a*b* adjustments, custom color profiles, HSV equalizers, and a powerful tone curve system. Its color management is precise and extremely flexible. Where RawTherapee particularly excels is the Auto-Matched Tone Curve feature, which analyzes your camera’s embedded JPEG profile and builds a tone curve to match it — genuinely useful when you want a starting point close to your camera’s out-of-camera rendering.
Noise Reduction and Sharpening
RawTherapee’s noise reduction and sharpening tools are among its strongest arguments. The Wavelets toolset — which operates on different frequency layers of the image — gives you control over contrast, sharpness, chroma noise, and luminance noise at a level most commercial software doesn’t offer. RawTherapee also supports multiple demosaicing algorithms (AMaZE, VNG4, LMMSE, and more), letting you choose the best approach for your specific sensor pattern and combat moiré with precision.
Darktable’s noise reduction is handled primarily through the denoise (profiled) module, which uses camera-specific noise profiles (or community-built ones) to apply intelligent, automatic noise reduction. It’s excellent and user-friendly — but offers less manual frequency-band control than RawTherapee’s Wavelets.
For sharpening, RawTherapee again edges out Darktable with tools like RL Deconvolution, Unsharp Masking, and a dedicated Capture Sharpening module designed to correct softness introduced at capture before any creative sharpening is applied.
RAW File and Lens Correction
RawTherapee supports Adobe Lens Correction profiles (.lcp files), which means if you already have a Lightroom lens profile library, it transfers directly. Darktable relies on the lensfun open-source library, which has solid coverage of popular lenses but can fall short for niche or newer glass. However, Darktable lets you build custom calibration profiles using calibration images — a useful workaround, though it requires extra effort.
Worth noting: RawTherapee currently has limited support for Canon’s newer CR3 RAW format, which can be a real-world dealbreaker for Canon R-series shooters.
Performance: What to Expect on Real Hardware
Darktable is built around GPU acceleration via OpenCL. On a modern system with a capable graphics card, it renders edits quickly and handles large files without flinching. On older or GPU-limited systems — integrated graphics, aging laptops — Darktable can feel sluggish, and the experience degrades noticeably without OpenCL support.
RawTherapee uses a multithreaded CPU approach that runs respectably even on older hardware. Preview rendering can feel slower than Darktable on GPU-equipped machines, and dragging some sliders won’t give you the instant feedback of a GPU-accelerated editor. But if you’re working on an older system or a machine without a discrete GPU, RawTherapee is the more reliable performer.
For batch processing and export queuing, both tools handle large volumes, though Darktable’s export presets and queuing options give it a slight workflow edge for high-volume jobs.
The Verdict: Which One Is Actually Right for You?
There’s no universally correct answer here — it genuinely depends on what you’re trying to do. But after extensive time with both tools, here are honest, scenario-based recommendations.
Choose Darktable if:
- You want a full Lightroom replacement with library management, catalog organization, and tagging built in.
- Local adjustments and masking are central to your editing style — whether that’s dodging and burning, isolating skies, or targeted color grading.
- You shoot commercially or do high-volume work and need robust filtering and collection tools to stay organized.
- Your system has a modern GPU, and you want a fast, responsive editing experience.
- You’re comfortable investing real time in learning — Darktable rewards patience generously.
Choose RawTherapee if:
- You keep your files organized in folders and don’t need or want a database managing your library.
- Precision color correction, fine-grained sharpening, and detailed noise control are your priorities.
- You’re working on older or lower-powered hardware without a strong GPU.
- You shoot RAW-only and need best-in-class RAW development quality without the complexity of full library management.
- You want to replicate your camera’s JPEG rendering as a reliable starting point using Auto-Matched Tone Curve.
Consider using both if: This might sound like a cop-out, but it’s genuinely how many experienced open-source photographers work. Use RawTherapee for technical development — getting the precise tones, colors, and detail you want — then use Darktable (or GIMP) for the heavier creative work that requires masking and local edits. Both export full-quality TIFFs that feed cleanly into any downstream workflow.
Final Thoughts
Both RawTherapee and Darktable prove that you don’t need to pay Adobe a monthly subscription to get professional-grade RAW editing. They each represent years of community-driven development and genuine photographic expertise baked into free software.
Darktable is the more complete system — a modern, modular photo lab that handles everything from import to export. RawTherapee is the more focused instrument — a precision RAW developer that does its specific job with uncommon depth.
The smartest move? Download both, spend a week with each, and let your real editing needs make the decision for you. Since both are completely free, there’s no reason not to.