Photographing jewelry is one of the most demanding forms of product photography. Each gemstone, metal surface, and tiny detail can either captivate a customer or send them scrolling.
Poor lighting, dust specks, reflections, or even a slight color imbalance can undermine an otherwise premium product. And unfortunately, many DIY or even semi-pro jewelry photography setups suffer from just that.
Today, we’ll talk about how to build a complete, scalable, and cost-effective jewelry photography studio—whether you’re a professional photographer, a brand, or a growing eCommerce seller.
1. Choosing the Right Space: Jewelry Photography Studio Location
A great photo starts with control, and control starts with the right space.
What Makes a Good Jewelry Photography Workspace?
- Dust-free: Macro lenses reveal everything. A stray fiber can ruin a shot.
- Clean & dedicated: Avoid shared workspaces like kitchens or living rooms.
- Light-controlled: Block natural light using blackout curtains, especially for consistency across sessions.
Natural light may seem appealing, but it’s unpredictable and changes every minute. For jewelry, you need stability—not surprises.
Setup Tips
- Choose a sturdy table or platform at an ergonomic height—your back will thank you.
- Use anti-static mats and avoid air vents nearby. Air movement stirs up dust.
- If needed, install an air purifier to reduce airborne particles over time.
Pro Tip:
Avoid setting up under HVAC vents. Even small air currents can push dust onto reflective surfaces. Use a HEPA air purifier for better control.
2. Backdrops That Make Jewelry Pop
Your backdrop is not just a background—it’s part of the story.
Jewelry is small, reflective, and detail-rich. So the wrong background can easily overpower it.
Neutral Backdrops: The eCommerce Standard
Platforms like Amazon, Etsy, and Shopify often require or favor a white or neutral background. It makes your jewelry stand out, especially for:
- Product thumbnails
- Catalog listings
- Zoomed-in product images
Off-white, light gray, and platinum tones are also ideal—they reflect light softly and subtly enhance sparkle without being harsh.
Contrasting Backgrounds for Drama
Want something more editorial or luxurious? Try black, navy, or deep burgundy backdrops.
These create high contrast and make silver or gold elements pop. Perfect for social media, branded campaigns, or high-end pieces.
For example, silver jewelry on navy creates a cold-luxury vibe. Gold on burgundy suggests richness.
Break the white-background rule strategically when you want to create mood or brand identity.
Gradient & Textured Backgrounds
When you want to go beyond solid color:
- Textured fabrics like silk or velvet offer elegance.
- Brushed metal, concrete slabs, or hand-painted boards add character.
- Gradient backdrops add subtle depth and movement.
Build your own background boards using foam core and adhesive swatches. They’re reusable and perfect for fast changes during a shoot.
3. Studio Lighting Setup for Jewelry Photography
Lighting isn’t important—it’s everything.
Jewelry is reflective, metallic, and sometimes transparent. That means light placement, quality, and intensity must be carefully controlled.
Let’s break down your options.
Continuous Lighting: LED or Fluorescent
These lights stay on while you compose and shoot. What you see is what you get.
- Look for CRI ratings of 95+ for true-to-life colors.
- Adjustable color temperature (5000K–5500K) helps you match daylight tones.
- Popular brands: Godox, Neewer, Lume Cube.
These are beginner-friendly and budget-scalable.
Strobes & Flashes
Used more often in pro studios, strobes freeze motion and help highlight facet brilliance—especially for diamonds and gemstones.
But they require:
- Syncing via triggers or remote
- Proper diffusion to avoid hotspots
- More post-processing calibration
Use strobes only if you’re confident with flash modifiers and sync setups.
Light Modifiers & Accessories
Modifiers help soften or control harsh reflections:
- Softboxes: 24×24” works great for rings and earrings.
- Diffusers: Tracing paper, white fabric, or 5-in-1 reflectors soften light.
- Reflectors:
- Silver = crisp light
- White = soft fill
- Gold = warm tone
- Flags & Gobos: Use black foam board to block light spill and control lens flare.
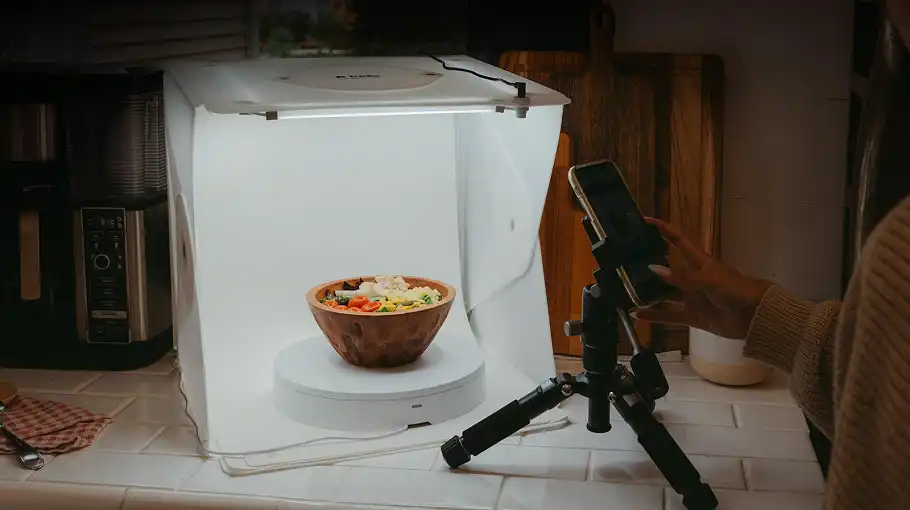
Lightboxes and Tents
For full control, use enclosed systems like:
- GemLightbox
- Foldio3
- Budget light tents from Amazon
These create even lighting and are great for product catalogs.
Lighting Angles Matter
Most beginners light jewelry straight-on—which causes glare.
Instead:
- Use lights at a 45–60° angle from the subject.
- Stick to 2–3 lights max:
- Key light (main)
- Fill light (opposite side)
- Accent or backlight
For premium control, consider cross-polarized setups to eliminate unwanted reflections entirely.
4. Cameras, Lenses & Gear Essentials
Your camera doesn’t need to be the latest or most expensive—but it must offer manual control and RAW shooting.
Camera Bodies That Work
- DSLRs: Canon EOS 90D, Nikon D7500
- Mirrorless: Sony A6400, Canon EOS R
Mirrorless options are lighter and offer great live preview tools, but DSLRs often have better battery life and more budget lens options.
Macro Lenses: Your Secret Weapon
Macro lenses let you capture true-to-life size shots with razor-sharp detail.
Best focal lengths: 90mm–105mm
- Canon EF 100mm f/2.8L IS USM
- Sigma 105mm f/2.8 EX DG OS HSM
- Nikon AF-S 105mm f/2.8G IF-ED VR
Look for 1:1 magnification, image stabilization, and sharp center performance.
Tripods, Arms & Stabilizers
Camera shake kills clarity in macro photography.
- Use a macro tripod with a geared head for micro adjustments.
- An L-bracket or horizontal arm lets you do flat lays or top-down shots without contorting yourself.
- Keep a remote shutter or shoot tethered to avoid pressing the shutter manually.
5. Jewelry Display & Positioning Tools
Proper positioning adds dimension and realism to your shots.
- Museum putty: Holds rings upright without showing.
- Dental wax: Great for tiny props or holding earrings.
- Clear fishing line: Create “floating” jewelry shots.
Also consider:
- Acrylic risers for subtle lift
- Velvet busts, earring T-bars, and bracelet ramps
- Mannequin hands, textured stones, or even minimalist props for lifestyle-style images
Flat lay? Keep symmetry.
Suspended? Balance line tension.
Bust display? Mind the neckline shape.
6. Mastering Reflection and Glare Control
This is where beginners often get stuck.
Jewelry reflects everything—including yourself, the camera, and the ceiling.
Reduce Reflections with These Techniques:
- Polarizing filters on lenses remove surface glare from metals.
- Position lights at indirect angles to bounce light without flaring.
- Use diffusers and flags to shape and block reflection.
- Build a paper tunnel or a U-shaped bounce card wall around your piece.
Some pros even shoot through acrylic sheets, creating a consistent light buffer and blocking reflections.
Handling Jewelry the Right Way
Don’t touch jewelry with bare hands.
- Wear cotton gloves
- Use a dust blower between every few shots
- Wipe with microfiber cloths before setup
Even the tiniest speck becomes a retouching nightmare at macro scale.
7. Jewelry Positioning Tools & Props
Jewelry rarely stands perfectly on its own. Without the right tools, it’ll slip, tilt, or look unflattering on camera.
Here’s what you need to master composition:
Handling Tools
- Cotton gloves: Avoid fingerprints on metal or gemstones.
- Microfiber cloth: Constantly clean surfaces—especially for reflective stones.
Positioning Tools
- Museum wax or poster putty: Holds rings upright or earrings in place.
- Fishing line: Invisible thread to suspend necklaces or dangles.
- Tweezers and small clamps: For fine positioning.
- Sticky dots: Temporary adhesive for lightweight pieces.
Props & Stands
- Acrylic risers or small pedestals for elevation.
- Velvet holders or jewelry stands (in neutral tones) to support layout without distracting.
- For luxury branding, consider custom props or natural elements like marble slabs or dried flowers.
Keep it minimal—your props should complement, never compete.
8. Composition & Styling: How to Arrange Jewelry for Photography
The most technically perfect image can still fail—if the styling is dull.
Start with Symmetry
Rings should sit centered. Earrings should align evenly. Chains should be de-tangled and flow naturally.
Use the Rule of Thirds
Place your subject slightly off-center using the grid lines in your camera viewfinder. This creates more natural visual flow.
Build a Story
- For luxury branding, create space and let the piece breathe.
- For stackable sets, arrange rings, bangles, or earrings in slight overlap to show context.
- For styled shots, use clean props like dried botanicals, silk fabric, or stones to add texture.
Don’t forget scale—showing jewelry on a stand, finger, or bust can help customers understand size better than specs alone.
What to Avoid
- Reflections of you or your gear in polished metals.
- Too much cropping—leave room for post-edit framing.
- Backgrounds or props that overpower the product.
9. Retouching & Post-Processing for Jewelry Photography
Here’s the honest truth: even the best photographers can’t get perfect jewelry photos straight out of the camera. That’s where expert post-processing comes in.
What You’ll Need to Fix
- Dust specks
- Color inconsistencies
- Dull gemstones
- Scratches and reflections
- Metal tone corrections (e.g. yellow gold that looks green under LED)
Software Choices
- Adobe Lightroom: Great for color correction and batch editing.
- Photoshop: Essential for detailed retouching—cloning, healing, and background cleanup.
- Capture One: Excellent RAW handling and color precision for studio work.
What Pixel Retouching Offers
Let our experts handle:
- Dust and blemish removal (especially important for macro shots)
- Color grading to bring out gemstone vibrance
- Reflection correction
- Metal cleanup for polished gold, platinum, silver
- High-end background removal or replacement
We don’t just clean—we enhance without overdoing it. Your product stays real, but ready for premium display.
10. Shooting Tethered: Why It’s a Game-Changer
Tethering connects your camera to a computer, letting you:
- Preview photos on a large screen
- Make instant exposure or focus tweaks
- Keep clients or team members involved in real time
Tools like Capture One, Lightroom, or Smart Shooter allow for live view, marking selects, and auto-saving to your hard drive.
Bonus: Tethering reduces handling of the camera, which lowers shake and keeps your composition consistent.
11. Image Consistency: Why It Matters for eCommerce & Branding
A product page with inconsistent lighting, crooked angles, or mixed backgrounds signals unprofessionalism—no matter how beautiful the jewelry is.
To build trust (and increase sales), maintain:
- Identical lighting setups for all pieces in a collection
- Matching backgrounds and aspect ratios
- Consistent cropping and spacing
- Uniform editing presets
Use templates and guides during shooting. Build a repeatable system.
12. Advanced Techniques: Focus Stacking, Polarization & Reflections
When you’re ready to go next level:
Focus Stacking
Jewelry has shallow depth of field at close distances. To keep the whole piece sharp:
- Take multiple shots at different focus points
- Blend them in Photoshop or Helicon Focus
Perfect for rings, watches, or multi-stone bracelets.
Cross Polarization
Use a polarizing filter on your lens and another on your light source. Rotate one to eliminate surface reflections—leaving just the color and clarity.
Creative Reflection Surfaces
Want drama? Shoot on:
- Glossy black acrylic
- Frosted glass
- Brushed metal sheets
Just clean like crazy. Every speck shows.
Bonus: Jewelry Photography Studio Setup Checklist
 Dust-free workspace with blackout curtains
- Neutral and textured backdrops
- High-CRI continuous lights or strobes
- Macro lens (90–105mm)
- Tripod with adjustable head
- Positioning wax, tweezers, gloves
- Editing software (Lightroom + Photoshop)
- Clean cloths and air blower
- Reflectors and diffusers
- Tethering setup (optional, but amazing)
Bottom Line
Building a jewelry photography studio doesn’t have to happen all at once. Start with the essentials: one light, one backdrop, one macro lens—and get your process dialed in.
As your skill or volume grows, upgrade your tools and techniques. Whether you’re a solopreneur, a boutique brand, or a pro photographer, consistency is what sells jewelry online.
And when you’re ready to take your images from great to exceptional, Pixel Retouching is here to handle the post-production side—so your photos are worthy of the pieces you’re selling.
Frequently Asked Questions
What camera settings work best for jewelry photography?
Start with ISO 100, aperture f/8–f/11 for sharpness, and a shutter speed adjusted to your lighting. Always shoot in RAW.
How do I prevent reflections on metal surfaces?
Use diffused light, black flags to block reflections, and cross-polarizing filters if needed.
Is it okay to use my phone for jewelry photography?
Yes—for social or quick shots. But for catalogs and high-end images, a camera with a macro lens and manual control will always produce better results.
How much retouching is too much?
Retouching should clean and enhance—not fake or mislead. Keep textures, true colors, and natural details intact.