Camera shake is one of the most persistent barriers to achieving consistently sharp images. Unlike focus errors or subject motion, camera shake originates entirely from the photographer’s physical interaction with the camera. The good news: it is highly trainable, technically manageable, and almost always solvable with the right combination of technique, settings, and support.
This guide provides a structured, evidence-based approach to eliminating handheld camera shake. Whether you are a beginner mastering fundamentals, a seasoned shooter working in low light, or someone managing benign essential tremor, you will find actionable, field-tested solutions here.
What Is Camera Shake and Why Does It Matter for Sharp Photos?
Camera shake refers to the unintended physical movement of the camera during exposure, resulting in uniform or directional motion blur across the entire frame. It is distinct from:
- Focus error: Subject or plane of focus appears soft, but static elements remain crisp.
- Subject motion: Moving elements blur while stationary backgrounds stay sharp.
Camera shake becomes visually apparent when shutter speed drops below the threshold required to freeze micro-movements. It disproportionately affects:
- Telephoto and super-telephoto focal lengths
- Low-light and indoor environments
- Long handheld exposures
- Heavy camera-lens combinations
Sharpness is not just an aesthetic preference; it directly impacts perceived image quality, professional credibility, and cropping flexibility. Mastering handheld stability is a foundational skill that compounds across every genre of photography.
What Causes Camera Shake When Shooting Handheld?
Camera shake typically stems from three overlapping categories: physical factors, technical settings, and environmental conditions.
Physical factors include grip posture, muscle fatigue, and natural tremor. Unbraced elbows, heavy gear, prolonged shooting sessions, or conditions like benign essential tremor all contribute to baseline instability.
Technical factors involve shutter speed selection, stabilization status, and exposure triangle balance. Shutter speeds slower than 1/focal length, disabled image stabilization, or underexposed base settings force compromises that amplify shake visibility.
Environmental factors such as ambient light levels, wind, temperature, and terrain create external variables that challenge handheld stability. Dim interiors, cold-induced stiffness, uneven footing, or gusty conditions all increase the demand on your technique.
Quick Diagnostic: Blur Type Identification
| Cause Category | Primary Attributes | Typical Values/Triggers |
|---|---|---|
| Physical | Grip posture, muscle fatigue, natural tremor | Unbraced elbows, heavy gear, prolonged shooting sessions, essential tremor |
| Technical | Shutter speed selection, stabilization status, exposure triangle balance | Shutter < 1/focal length, IS disabled, underexposed base settings |
| Environmental | Ambient light, wind, temperature, terrain | Dim interiors, cold-induced stiffness, uneven footing, gusty conditions |
Key Insight: Most handheld blur is not a gear limitation but a technique-setting mismatch. Modern cameras and lenses provide substantial stabilization headroom; leveraging them correctly closes the gap.
Read Also 20+ Photography Inspiration Sources & Ideas for Sunting Photography
How Should You Hold Your Camera to Minimize Hand Tremor?
Technique is your first line of defense. Proper biomechanics reduce tremor amplification and create a stable shooting platform.
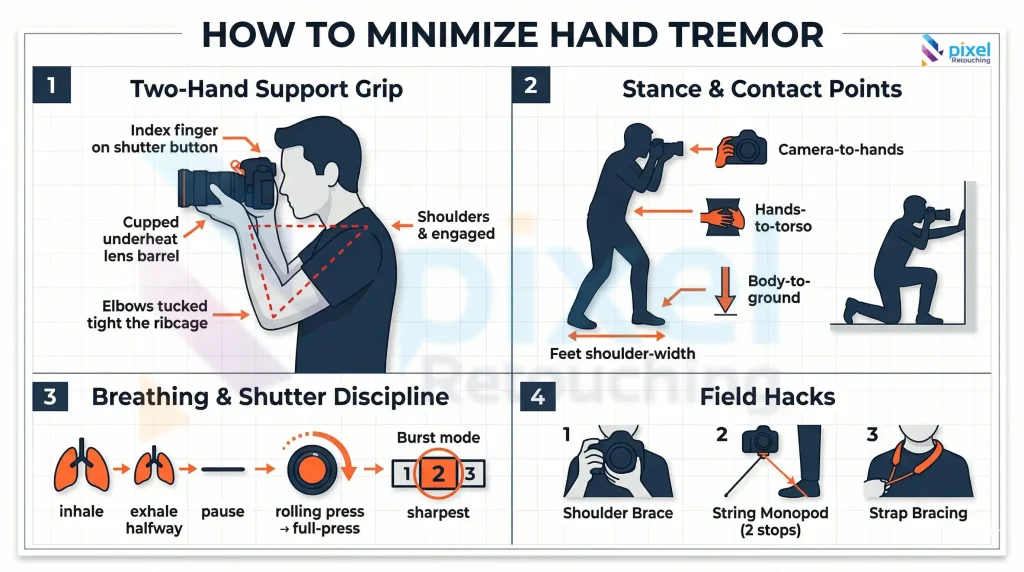
1. The Two-Hand Support Grip
- Right hand: Secure on camera grip, index finger resting lightly on shutter release
- Left hand: Cupped under the lens barrel or zoom ring, supporting weight from beneath
- Elbows: Tucked tightly against the ribcage, forming a rigid triangle with the torso
- Shoulders: Relaxed but engaged; avoid lifting or hunching
2. Stance and Contact Points
- Feet shoulder-width apart, knees slightly flexed
- Weight distributed evenly, torso slightly leaned into the camera
- Three-point contact rule: Camera-to-hands, hands-to-body, body-to-ground/wall
- When available, brace against walls, doorframes, trees, or kneel with one knee down
3. Breathing and Shutter Discipline
- Inhale normally, exhale halfway, pause, then depress shutter
- Avoid breath-holding: it increases muscle tension and induces micro-tremors
- Use a rolling press: half-press for focus, smooth full-press for capture
- Engage burst mode (3–5 frames) when shooting at marginal shutter speeds; the middle frame is statistically sharpest due to reduced initial button-press shock
4. Field-Proven Stabilization Hacks
- Joe McNally Shoulder Brace: Rest camera base against collarbone/shoulder, grip firmly, align eye with viewfinder. Highly effective for slow shutter handheld work.
- String Tension Monopod: Tie cord to tripod socket, loop under foot, pull taut. Creates instant vertical resistance. Cost: ~$0.50, Effectiveness: up to 2 stops improvement.
- Camera Strap Bracing: Pull neck strap taut while shooting. Adds counter-tension that dampens forward/backward sway.
Read Also: Merchandising Photography: A Complete Guide for E-commerce Success
Camera Settings That Prevent Camera Shake?
Settings dictate how much physical stability you actually need. Adjusting exposure parameters strategically reduces the demand on your hands.
The Reciprocal Rule (Baseline Shutter Speed)
- Formula: Minimum shutter speed ≈ 1 ÷ focal length (in 35mm equivalent)
- Examples:
- 35mm lens → 1/35s minimum (use 1/40s or 1/50s as safe margin)
- 85mm lens → 1/85s minimum (target 1/100s)
- 200mm lens → 1/200s minimum (target 1/400s for telephoto safety)
- Crop sensor adjustment: Multiply focal length by crop factor first (e.g., 50mm on APS-C ≈ 75mm → 1/80s minimum)
ISO and Aperture Strategy
- ISO: Modern sensors cleanly handle ISO 1600–6400. Prioritize sharpness over noise. A clean 6400 ISO image crops and downsamples better than a blurry 400 ISO file.
- Aperture: Open to f/1.4–f/2.8 when light is limited. Accept shallower depth of field; you can focus-stack or step back if needed.
- Exposure triangle priority: Shutter speed > Aperture > ISO for handheld sharpness.
Image Stabilization Systems
| System Type | Compensation Range | Best Use Case | When to Disable |
|---|---|---|---|
| Lens OIS/VR | 3–4.5 stops | Telephoto, prime lenses | On tripod (can induce micro-drift) |
| IBIS (Sensor-shift) | 5–8 stops (modern mirrorless) | Wide/standard lenses, video | When panning (use lens-only or custom mode) |
| Hybrid (IBIS + OIS) | Up to 8+ stops | Low light, extreme telephoto | Rarely; only if firmware conflicts occur |
Pro Setting Workflow:
- Set Shutter Priority (S/Tv) or Manual with Auto ISO
- Define minimum shutter speed in camera menu (e.g., 1/100s)
- Enable appropriate IS mode (Normal/Panning)
- Use 2-second self-timer or wireless trigger for static subjects to eliminate button-press vibration
What Equipment Actually Reduces Camera Shake Without a Tripod?
Gear should complement technique, not replace it. Choose support tools based on mobility needs and shooting context.
Stabilization Hardware Hierarchy
- Tripod: Maximum stability for landscapes, architecture, long exposure, studio work. Use carbon fiber for weight reduction.
- Monopod: Ideal for sports, wildlife, events. Provides vertical support while retaining mobility.
- Gimbal/Stabilizer: Optimized for video motion; less relevant for stills unless shooting run-and-gun hybrid content.
- Mini Supports: Bean bags, clamp mounts, pocket tripods. Excellent for improvised field stabilization.
Lens and Camera Selection Guidelines
- Prioritize lenses with optical stabilization if shooting handheld frequently
- Fast primes (f/1.4, f/1.8) reduce reliance on high ISO and slow shutter speeds
- Mirrorless bodies generally offer superior IBIS integration and lighter weight vs. DSLRs
- Keep total kit weight under 1.5kg for extended handheld sessions to delay fatigue-induced shake
Budget-Friendly Alternatives
- DIY string monopod (cord + carabiner)
- Camera strap tension technique
- Improvised rests: bag, wall, knee, railing
- Lightweight travel tripods with center-column hooks for ballast
Adapting to Special Scenarios
Photography with Medical Tremors or Essential Tremor
- Shift focus from technique perfection to system optimization
- Maintain shutter speeds ≥ 1/250s whenever possible
- Rely heavily on IBIS/OIS hybrid systems
- Use burst mode + AI culling to isolate sharp frames
- Mindset note: Tremor does not preclude professional results. Many working photographers adapt successfully with the right workflow and gear pairing.
Low-Light and Night Handheld
- Combine: Wide aperture + Elevated ISO + Active stabilization + Body bracing
- Exploit ambient light sources (streetlights, windows, neon) as directional fill
- Shoot in RAW to recover shadow detail without introducing noise-induced softness
Telephoto and Wildlife Handheld
- Apply stricter reciprocal rule (1/1.5× to 1/2× focal length)
- Use a monopod for vertical stability during long waits
- Disable stabilization when actively panning with moving subjects
- Pre-focus or use subject-tracking AF to eliminate focus-hunt shake
Video-Specific Considerations
- Gimbals or electronic stabilization (EIS) are standard for motion
- For hybrid shooters, enable in-camera digital stabilization cautiously (crop penalty applies)
- Post-production stabilization (Warp Stabilizer, Mercalli) works best when paired with 60fps+ base footage
Post-Processing and Image Recovery
Not every slightly soft image must be discarded. Modern recovery tools can salvage mild camera shake, but prevention remains superior to correction.
Standard Sharpening Workflow (Lightroom/Capture One)
- Apply masking slider to limit sharpening to edge contrast areas
- Avoid radius values > 1.0 for handheld blur
- Use noise reduction before sharpening to prevent halo artifacts
AI-Powered Recovery Tools
- Topaz Sharpen AI: Specialized in motion blur and shake recovery. Best for mild-to-moderate shake.
- Adobe Enhance Details / Super Resolution: Improves micro-contrast and edge definition when paired with RAW files.
- Limitations: Severe directional blur, out-of-focus subjects, or heavy subject motion cannot be reconstructed. AI interpolates; it does not create missing optical data.
When to Delete vs. Recover
- Evaluate at 100% magnification on a calibrated monitor
- Ask: Is blur uniform across frame? (Camera shake) vs. localized? (Focus/subject motion)
- Batch review workflow: Flag keepers, apply AI sharpening selectively, discard frames with unrecoverable smear
How Do You Train Your Hands for Consistently Sharp Images?
Stability is a trainable skill. Consistent drills build neuromuscular adaptation faster than occasional shooting sessions.
Daily Stability Exercises (5–10 minutes)
- Dry-Fire Drill: Hold camera at eye level, practice smooth shutter press without capturing. Focus on breathing and elbow tuck.
- Threshold Testing: Shoot at progressively slower shutter speeds (1/60 → 1/30 → 1/15) with fixed focal length. Identify personal handheld limit.
- Support Variation: Compare freehand vs. wall-braced vs. strap-tension shots at identical settings. Document sharpness differences.
Self-Assessment Checklist
- I maintain shutter speed ≥ 1/focal length equivalent
- My elbows stay tucked during handheld shooting
- I enable appropriate IS mode for the scenario
- I review critical shots at 100% before moving locations
- I adjust ISO/aperture before accepting slow shutter speeds
Progressive Challenge Ladder
- Achieve consistent sharpness at 1/60s with 35mm lens
- Handhold 1/30s using body bracing and breathing control
- Capture sharp 200mm shots at 1/200s with stabilization active
- Shoot indoor event at 1/80s, f/2.8, ISO 3200 without flash
Track results weekly. Improvement compounds within 3–4 weeks of deliberate practice.
Final Takeaways
Eliminating camera shake requires a systematic approach that aligns biomechanics, exposure parameters, and equipment strategy. Maintain a braced posture with elbows locked and weight distributed evenly. Prioritize shutter speed over all other exposure variables, leveraging ISO and aperture to sustain your minimum threshold. Enable image stabilization appropriately, recognizing when to activate, disable, or switch modes based on support conditions. Select a gear that complements your shooting style without exceeding comfortable handling limits. Train deliberately, review critically, and adapt continuously.