There is one variable that determines whether a jewelry listing converts or gets scrolled past: the photograph. Not the price. Not the description. Buyers on eBay make purchasing decisions in seconds, and when they cannot physically hold a ring or examine a bracelet under natural light, the image carries the entire burden of trust. Getting that right requires more than a decent phone camera. It requires understanding light behavior, material science, and the psychology of online buyers.
This guide covers the complete workflow from cleaning the piece before the first shot to exporting a file that meets eBay’s technical specifications and ranks well in search.
eBay’s Image Requirements: The Non-Negotiable Baseline
Before discussing technique, the platform rules matter. eBay requires a minimum resolution of 1600 pixels on the longest side. Files must be saved in JPEG or PNG format and use the sRGB color profile. Listings with images below this threshold are suppressed in search results, which means a technically inferior photo does not just look bad — it actively costs visibility.
File naming also contributes to discoverability. A file called IMG_4821.jpg passes no contextual information to search engines. Renaming it 14k-gold-diamond-solitaire-ring-engagement.jpg reinforces the keyword relevance of the listing page itself. This is a minor step that most sellers overlook and one of the easier wins available. See more here.
| Requirement | Specification |
|---|---|
| Minimum resolution | 1,600px on the longest side |
| Accepted file formats | JPEG, PNG |
| Color profile | sRGB |
| Recommended max resolution | 9,000px |
| Max file size | 12MB per image |
| Max images per listing | 24 |
| Background (main image) | Pure white recommended |
| No watermarks or text overlays | Required for main image |
Download the jewelry photography cheat sheet for eBay Equipment: What You Actually Need
Professional jewelry photography does not require a professional budget. The two setups below cover the full range of sellers, from someone clearing personal inventory to a high-volume reseller processing dozens of listings weekly.
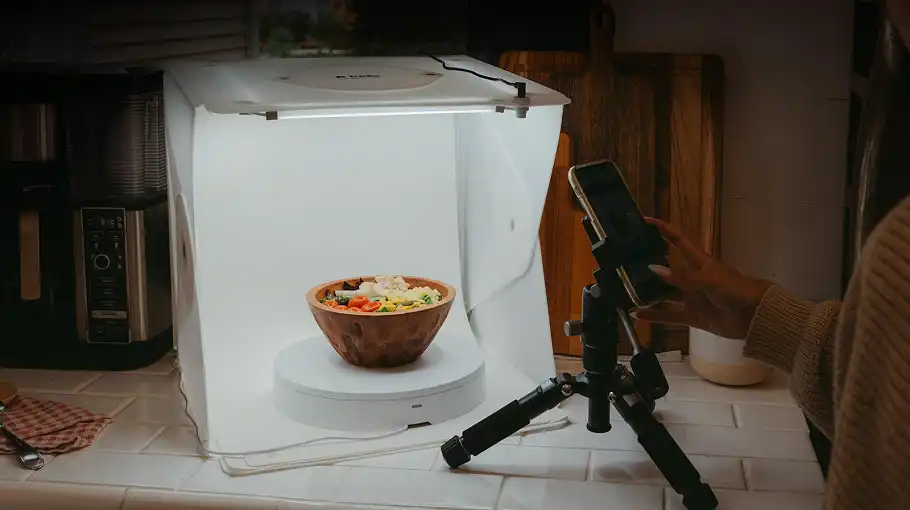
The minimalist kit consists of a modern smartphone, a compact tripod or phone clamp stand, a sheet of white foam board, and a microfiber cloth. This combination is capable of producing images that meet eBay’s requirements and convert well — provided the lighting and technique are correct.
The production setup centers on an entry-level mirrorless camera or DSLR paired with a dedicated macro lens, typically in the 60mm to 100mm focal range. A macro lens renders the fine detail of a gemstone’s facets or the texture of a chain link at a level no smartphone can match. Add a sturdy tripod with a ball head and a portable LED lightbox, and you have a repeatable, consistent system that scales.
The single most important accessory regardless of budget is the tripod. Motion blur at the pixel level destroys the zoom experience eBay’s interface provides buyers. Even a half-second exposure on a stable surface outperforms a handheld shot taken with a faster shutter.
Lighting: The Technical Core of Jewelry Photography
Jewelry is not just reflective — it is optically complex. Gold, silver, platinum, and faceted gemstones each interact with light differently. Direct flash aimed at a polished metal surface returns a single harsh specular highlight that obscures the form beneath it. Diffused light wraps around curved surfaces, reveals depth, and keeps gemstone fire visible without washing it out.
Natural window light with a sheer white curtain acting as a diffuser is the most accessible option for small-volume sellers. Position the piece perpendicular to the window so the light source is to one side. Place a white foam board opposite the window to bounce fill light into the shadow side. This prevents the dark, flat appearance that makes jewelry look cheap in photographs.
Studio lighting with softboxes or LED panels gives you control over color temperature and eliminates the variability of changing daylight. For consistent product photography across a catalog, color-calibrated daylight-balanced LEDs set at 5500 Kelvin produce the neutral rendition that makes gold look like gold and silver look like silver, not brass and pewter respectively.
Reflections are the central challenge of jewelry photography. A polished ring or pendant will reflect everything in front of it, including you. The solution is to build a small shooting environment using white poster board. Cut a small hole in the board and shoot through it, so the piece sees only white in every direction. This technique, sometimes called a “lens hole” setup, eliminates the dark circular reflection that appears in the center of domed surfaces when a camera shoots straight on.
Bounce cards and flags give you additional control over the final image. A small piece of white card placed close to the piece fills shadows without adding additional light sources. A small piece of black card placed near a silver or white gold piece introduces a subtle edge contrast that defines the form — without it, the edges of pale metal can disappear against a white background.
The Five Shots Every Jewelry Listing Needs
A single image is not enough for high-value jewelry. Buyers need to examine the piece from multiple perspectives before they commit. These five angles, shot consistently, give a listing the depth that builds purchasing confidence.
The hero shot is shot from a slight elevation, roughly 45 degrees above the piece, centered and in sharp focus across the primary surface. This is the thumbnail image — it must read clearly at small sizes and reward closer inspection.
The detail shot uses macro focus to isolate the gemstone, the hallmark stamp, the clasp mechanism, or any other feature that differentiates the piece. For diamond jewelry, this is where cut quality and clarity become visible. For vintage pieces, this is where the maker’s mark or karat stamp proves authenticity.
The profile or side view shows depth and construction. A ring’s band profile, a pendant’s bail, a bracelet’s link construction — these dimensions cannot be communicated from the front angle alone.
The scale reference shot solves one of the persistent problems in online jewelry retail: buyers frequently misjudge size. Photographing a ring next to a standard coin or on a hand model gives buyers an immediate sense of proportion that measurements in a description rarely achieve alone.
The packaging shot photographs the jewelry inside its presentation box or pouch. This raises the perceived value of the listing, communicates that the item ships presentation-ready, and is particularly effective for pieces being purchased as gifts.
Cleaning and Handling: The Step Most Sellers Rush
At 1600 pixels and higher, a fingerprint on a diamond looks like a grease smear. A strand of dust across a chain looks like damage. The piece must be cleaned before every session, not just at the start of the day.
Use a soft microfiber cloth to remove surface oils and dust. For gemstone pieces, a clean soft-bristle brush with warm water removes residue from around prongs and settings. Handle the piece afterward only with cotton gloves or tweezers — the oils from clean hands transfer immediately and invisibly to the surface.
This step takes two minutes. Skipping it means shooting the piece twice.
Post-Processing: Correction, Not Fabrication
Color grading jewelry images is not about making the piece look better than it is — it is about making it look accurate. Raw camera files often render gold with an orange cast and silver with a blue-gray tone. Correcting white balance to a neutral baseline removes these artifacts without altering how the piece will look in a buyer’s hands.
Background removal creates a clean white or transparent background that works across eBay’s interface and any secondary platform the seller uses. AI-based background removal tools have made this accessible to sellers without photo editing experience, though complex pieces with chains or prong settings sometimes require manual correction at the edges.
One caution applies to all post-processing: accuracy matters more than appearance. Listings where the item arrives looking different from the photographs — brighter, more saturated, more included — generate returns and negative feedback. Buyers feel deceived, and that feeling transfers to the seller’s reputation. The goal of editing is a faithful representation at its best.
Common Mistakes That Cost Sales
Avoid these photography pitfalls to ensure your listings look professional and trustworthy.
1. Inconsistent Lighting Across Multi-Image Listings
- The Problem: When your hero shot is warm and yellowish but your detail shot is cool and blue, the piece looks like two different objects. This inconsistency is immediately noticeable to buyers.
- The Fix: Use a consistent setup with locked white balance to ensure color accuracy across every image.
2. Over-Sharpening in Post-Processing
- The Problem: Heavy editing creates artificial, digital-looking edges. Experienced buyers recognize this as a sign of manipulation rather than quality.
- The Fix: Capture sharpness in-camera using macro focus and a stable tripod. Apply only light sharpening during editing.
3. Shooting Through Dirty Backgrounds or Surfaces
The Fix: Ensure your background is clean, neutral, and free of any debris that might distract from the product.
The Problem: Dust, scratches, and shadow gradients read as negligence. These distractions pull focus away from the piece itself.
Final Thought
Taking great photos of jewelry takes a bit of patience and practice. By investing in basic stabilization, mastering soft, diffused lighting, and utilizing clean editing techniques like background removal and shadow creation, you can transform your eBay listings. High-quality images build immediate trust with buyers, justify higher asking prices, and ultimately help your inventory move faster. Take your time, fill the frame, and let the jewelry speak for itself.