Learning how to take pictures of jewelry with iPhone sounds simple — but jewelry is one of the hardest subjects to photograph well. Tiny details, blinding reflections, and the pressure to make every ring, necklace, and bracelet look irresistible on Etsy, Instagram, or your online store make this a genuine skill worth mastering. The good news? Your iPhone is more than capable — when you know exactly what to do.
This guide covers every step of iPhone jewelry photography from setup to final edit, with dedicated workflows for Pro and standard iPhone models, material-specific lighting strategies, and platform-ready output for Etsy listings, Instagram Reels, and beyond.
Product photos drive purchasing decisions above everything else.
75% of online shoppers say product photos directly influence their buying decision — more than reviews or written descriptions. - A Study by Photoroom
What Makes Jewelry Photography Difficult — and How iPhone Solves It
Jewelry presents three core challenges that trip up most beginners:
High reflectivity. Polished silver, gold, and gemstones act like tiny mirrors. They pick up every light source around them — including the iPhone lens itself.
Extreme close-up detail. A ring is small. Getting a sharp, in-focus shot at close range requires precise depth-of-field control.
Colour accuracy. Metals and gemstones shift dramatically under different light temperatures. A warm white gold can look yellow; a cool platinum can look grey.
iPhones address all three problems through a combination of Macro Mode (on Pro models), manual exposure controls, ProRAW capture, and a capable editing ecosystem. The secret is knowing which tool to reach for and hen.
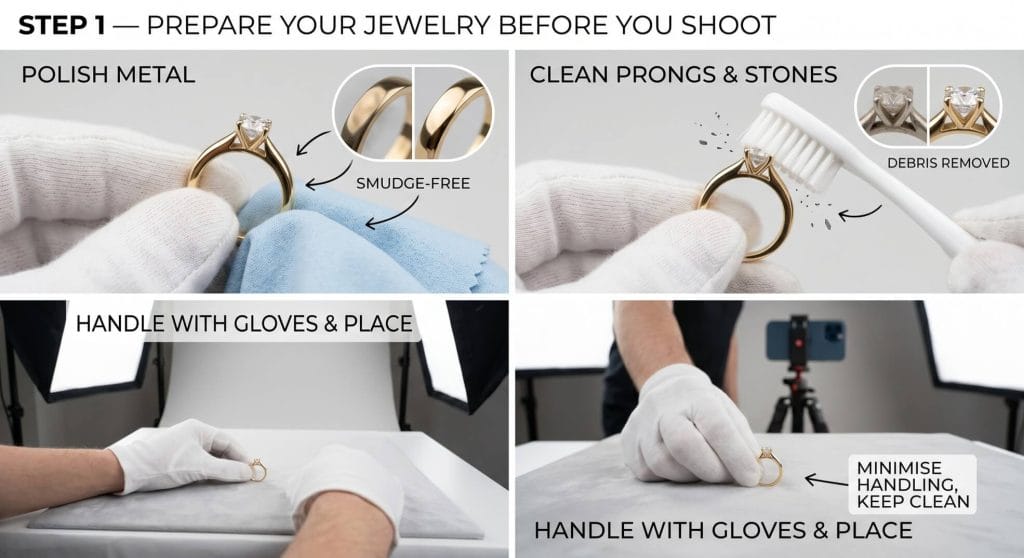
Step 1 — Prepare Your Jewelry Before You Shoot
The camera captures everything — including every smudge, fingerprint, and strand of dust on a 10mm ring. Preparation before the shoot saves hours of editing later.
Use a soft microfibre cloth to polish metal surfaces until they are completely smudge-free. For gemstones with prong settings, a clean, dry toothbrush removes debris from hard-to-reach areas. Handle the jewelry with cotton gloves once cleaned to avoid re-transferring oils from your fingers.
Place each piece on your shooting surface only after your lighting and iPhone settings are fully configured. This minimises handling and keeps the piece clean for the shot.
Step 2 — Choose the Right Background and Surface
The background in jewelry photography serves two purposes: it creates a clean, distraction-free product shot, and it acts as a passive light reflector or absorber depending on material.
White foam board or white paper is the most widely used surface for product photography because it reflects ambient light back onto the jewelry, softening shadows. It works best for Etsy listings and marketplace product shots where a clean white background is preferred.
Black velvet absorbs light rather than reflecting it, which creates striking contrast against gold and silver pieces. It is ideal for fine jewellery and luxury branding.
Acrylic blocks and risers allow you to photograph a piece from multiple angles, including from below. The transparent surface creates an elegant floating effect that performs well on Instagram.
Marble and textured surfaces add lifestyle context and are effective for editorial and social media shoots, though they require more attention to ensure the jewelry remains the visual focal point.
Avoid patterned or colourful backgrounds unless you are shooting editorial content. Patterns compete with the jewelry for attention and reduce perceived product quality.
Step 3 — Master Lighting for Jewelry Photography on iPhone
Lighting is the single most important variable in jewelry photography (both for indoor and outdoor jewelry photography) . The difference between a flat, dull shot and one that shows the true sparkle of a diamond or the warm lustre of gold is almost always lighting.
Natural Window Light — the Best Free Light Source
Position your shooting surface next to a large window with indirect, diffused daylight. Direct sunlight creates harsh shadows and over-exposes reflective surfaces. If sunlight is direct, hang a white sheet or tape a sheet of tracing paper over the window to diffuse it.
Position the jewelry at roughly a 45-degree angle to the window. This angle creates gentle shadows that give the piece three-dimensional form without blowing out highlights on polished metal.
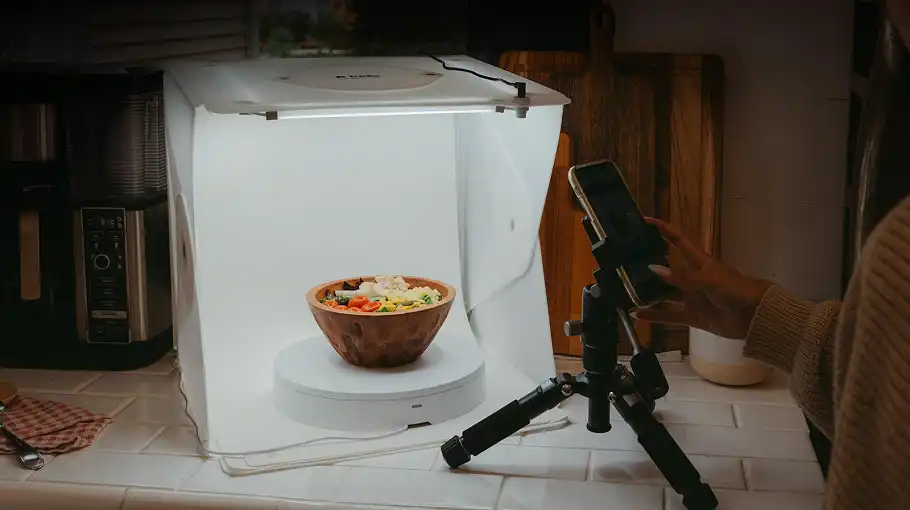
Build a DIY Lightbox for Consistent Results
A DIY lightbox gives you consistent, controlled light at a fraction of the cost of studio equipment. To build one:
Get a cardboard box approximately 40cm × 40cm × 40cm. Cut large rectangular openings in the left side, right side, and top. Cover all three openings with white tissue paper or a single layer of white fabric. Place a white foam board sheet inside the box as the floor. Position two daylight LED lamps outside the box — one on each side opening.
Place the jewelry inside and shoot through the open front. This setup diffuses light from three directions simultaneously, eliminating harsh shadows and dramatically reducing reflections on polished metals. It is repeatable — once set up, every shot in a product line will have consistent lighting.
Material-Specific Lighting Strategies
Not all jewelry responds to light the same way. Here is how to adjust your approach by material:
Polished silver and white gold are the most reflective materials. Use a larger light source placed further away (more diffusion, less intensity). A foam board bounce card opposite your main light source fills shadows without creating secondary reflections.
Yellow gold looks most flattering in slightly warm light. Position your main light at a 45-degree angle and use a warm-white LED lamp if shooting with artificial light. Avoid cool daylight, which can make yellow gold appear greenish.
Diamonds and faceted gemstones need a harder, more directional light source to reveal their sparkle and “fire” — the play of colour inside a faceted stone. A small, focused light source (rather than broad diffused light) positioned at about 30–45 degrees to the stone will cause it to refract and sparkle. Reduce fill light on the opposite side to maintain contrast.
Pearls and matte-finish metals look best under broad, diffused light. Pearls have a soft, subtle lustre that harsh light destroys. A large lightbox or wide window with heavy diffusion will show their smooth surface and gentle sheen accurately.
Translucent stones (opals, moonstones, rose quartz) benefit from backlighting. Position a light source behind and slightly below the stone to illuminate it from within. This technique reveals internal colour play that front lighting completely misses.
Step 4 — iPhone Camera Settings for Jewelry Photography
For iPhone 13 Pro, 14 Pro, 15 Pro, and 16 Pro — Enable Macro Mode
Macro Mode activates automatically on iPhone Pro models when you move within approximately 15cm of a subject. The camera switches to the ultra-wide lens and allows extremely close focusing distances, revealing fine detail in engraving, texture, and stone settings.
Open the Camera app and move slowly toward the piece. When the lens switches to Macro automatically, the image will snap to sharp focus at close range. If Macro switching feels disruptive, go to Settings → Camera → Auto Macro and toggle it off so you can control the switch manually using the flower icon in the camera interface.
For Standard iPhone Models (iPhone 13, 14, 15, 16 — Non-Pro)
Standard iPhones do not have a dedicated macro lens. Getting close with the 1× main lens and then cropping in post is acceptable for most uses, but quality degrades at extreme crops. The better approach is a clip-on macro lens.
The Moment Macro Lens (10× magnification) clips onto any iPhone and brings the close-up capability of a Pro model to standard devices. It costs significantly less than upgrading to a Pro iPhone and delivers professional close-up results for jewelry photography.
Avoid using the digital zoom on any iPhone for jewelry photography. Digital zoom reduces resolution and introduces artefacts that are clearly visible at the scale of fine jewelry details.
Enable ProRAW for Maximum Editing Flexibility
On iPhone 12 Pro and newer Pro models, go to Settings → Camera → Formats and enable Apple ProRAW. When shooting in ProRAW, the camera captures a DNG file that retains far more data in highlights and shadows than a standard JPEG or HEIF.
This matters for jewelry because polished metals often have both very bright highlights and very dark shadows in the same frame. A ProRAW file lets you recover blown-out highlights on a shiny clasp and lift shadow detail in an engraved pattern during editing — adjustments that are impossible on a processed JPEG.
For newer Pro models (iPhone 14 Pro and later), also consider enabling HEIF Max or RAW Max in Settings → Camera → Formats for maximum resolution capture at 48MP.
Lock Focus and Exposure with AE/AF Lock
This is one of the most important and most overlooked settings in iPhone jewelry photography. When you tap to focus, the iPhone continuously adjusts both focus and exposure. For a static jewelry shot, this constant recalculation can cause the exposure to drift between frames.
To lock both focus and exposure on the same point: open the Camera app, frame your shot, then press and hold the subject (the ring, the gemstone, the clasp) until a yellow “AE/AF Lock” banner appears at the top of the screen. Now both focus and exposure are locked. You can still adjust exposure manually by sliding the sun icon up or down. Lock it at the point where highlights on the metal are not overexposed and the stone retains visible detail.
Turn Off the Flash — Always
The built-in iPhone flash produces a flat, harsh light that washes out texture and creates severe reflections on polished jewelry. Turn it off in every scenario. Use natural light or your DIY lightbox instead.
Disable HDR Overprocessing for Reflective Metals
On highly reflective jewelry, the iPhone’s Smart HDR can sometimes produce over-processed results that make metals look artificial. Go to Settings → Camera and turn off Smart HDR. Shooting in ProRAW also bypasses most computational photography processing and gives you a cleaner, more neutral file to work with.
Adjust White Balance Manually with a Third-Party App
The iPhone Camera app does not offer direct white balance control. For precise white balance (measured in Kelvin) — which determines whether your gold looks warm or cool, and whether your silver looks clean white or grey — use a third-party app.
Halide is the most capable option. It offers manual control over ISO, shutter speed, white balance (in Kelvin), and Focus Peaking — a display mode that highlights in-focus edges in red, making it easy to see exactly where your focal plane falls on a multi-dimensional ring.
Camera+ 2 and ProCamera offer similar manual controls with slightly different interfaces. For most jewelry photographers, Halide is the preferred choice for its focus tools and clean ProRAW integration.
Step 5 — Composition and Shooting Technique
Shooting Angles That Work for Jewelry
The flat lay (top-down, 90-degree) angle works well for necklaces, bracelets, and rings laid flat on a surface. It is clean, simple, and preferred for Etsy main product images.
A 45-degree angle gives the jewelry dimension and depth. It is most effective for rings, pendants, and earrings where you want to show the profile and the face simultaneously.
Eye-level or close-perspective shots work for lifestyle and editorial content. Positioning the camera at the same height as a ring on a surface, for example, creates a dramatic perspective that emphasises size and detail.
Multiple angles per piece is best practice for marketplace listings. Shoot a flat lay, a 45-degree side view, a detail close-up of the stone or clasp, and a scale reference shot (the piece next to a hand or ruler).
Use a Tripod for Sharp Macro Shots
At the close distances required for jewelry photography, even the smallest hand movement creates blur. A small tabletop tripod with an iPhone mount is a worthwhile investment. It also frees both hands to position the jewelry and adjust bounce cards without having to restabilise the phone between shots.
Shoot in Burst Mode for Moving Pieces
For hanging pendants or pieces displayed on a rotating surface, use Burst Mode (press and hold the shutter button) to capture multiple frames quickly. You can then select the sharpest frame from the burst where the piece is in the most flattering position.
Step 6 — Focus Stacking for Sharp Rings and Bands on iPhone
A ring photographed at macro distance has a very shallow depth of field. The front of the band is in focus while the back dissolves into blur — which can look beautiful for hero shots but is less useful for product listings where the buyer wants to see the full piece clearly.
Focus stacking solves this by combining multiple photos taken at different focus points into a single image where everything is sharp.
On desktop, this is done in Photoshop. On iPhone, the Focos app allows you to perform focus stacking entirely within the device. Shoot three to five frames of the same ring, adjusting focus slightly between each shot (use AE/AF Lock to re-tap to a different part of the ring for each frame), then import the series into Focos and use its focus stacking function to merge the frames.
The result is a single image where the entire ring — from the front of the band to the back — is in sharp focus. This is a significant content differentiator, as almost no other iPhone jewelry photography guide covers this mobile workflow.
Also Read – How to Take Pictures of Jewelry with a Phone (Step-by-Step Guide)
Step 7 — Edit Your Jewelry Photos on iPhone
Capture is only half the process. Editing transforms a technically correct photo into a commercially compelling one.
Lightroom Mobile — the Industry Standard
Adobe Lightroom Mobile (free version is sufficient for most needs) gives you precise control over the key parameters that matter most for jewelry:
Exposure — lift or reduce overall brightness. For ProRAW files, you have far more headroom here before the image degrades.
Highlights — pull down to recover detail in blown-out metal surfaces.
Shadows — lift slightly to reveal detail in dark engravings or stone settings without affecting the overall exposure.
White Balance (Temp and Tint sliders) — adjust until metal colours look accurate. Cool down (shift toward blue) for platinum and white gold; warm up (shift toward amber) for yellow gold and rose gold.
Clarity — a moderate increase (around +15 to +25) enhances fine surface texture in metal and makes engravings more visible.
HSL (Hue / Saturation / Luminance) — use this to isolate and correct the colour of a specific gemstone without affecting the rest of the image. If a blue sapphire is reading slightly purple in the photo, reduce the purple hue slider.
Snapseed — Free and Powerful
Snapseed’s Selective tool lets you apply adjustments to a specific area of the photo — the stone only, the clasp only — without affecting the background. The Details tool sharpens fine texture extremely effectively for engraved metals.
For Background Removal — Photoshop Express or Remove.bg
For clean white or transparent backgrounds (required for many marketplace listings), Photoshop Express on iPhone offers one-tap background removal. The results are clean enough for most Etsy and Amazon listings without needing desktop software.
iPhone Jewelry Photography Workflows by Platform
Etsy Listings
Etsy recommends a minimum image size of 2000 × 2000 pixels. Shoot in ProRAW or at maximum JPEG resolution. Use a clean white or neutral background. For your main listing image, shoot a flat lay. Follow with a detail close-up, a scale reference, and a lifestyle shot. Export at full resolution as JPEG for upload.
Instagram Feed
Square (1:1) or portrait (4:5) crops perform best in the Instagram feed. Edit with a consistent colour tone across all jewelry images to build a cohesive visual brand. Bright, airy edits with lifted shadows and slightly desaturated backgrounds work well for fine jewelry. Dark, moody edits with black backgrounds suit fashion and costume jewelry.
Instagram Reels and TikTok
Vertical video (9:16) is the required format. Use iPhone’s Cinematic Mode (available on iPhone 13 and later) to shoot slow-motion reveal shots of jewelry — placing a ring on a surface, lifting a necklace, or opening a box. Cinematic Mode creates a shallow depth-of-field video effect that makes jewelry look expensive on screen.
Slow-Motion mode (Settings → Camera → Record Slo-mo at 240fps) captures the sparkle of a diamond or the swing of a pendant chain in extraordinary detail. Combine a slow-motion sparkle close-up with Cinematic Mode overview shots for compelling Reel content.
Essential Equipment for iPhone Jewelry Photography
You do not need expensive studio gear. These are the most impactful items at the lowest cost:
Clip-on macro lens (for non-Pro iPhones) — Moment 10× Macro. Brings professional close-up capability to any iPhone.
Small tabletop tripod with iPhone mount — eliminates blur from camera movement at close focus distances.
White foam board (A1 size, ×3 sheets) — backgrounds and bounce cards.
Tissue paper or white fabric — window diffusion and lightbox panels.
Daylight LED desk lamps (×2, 5500K) — consistent artificial light for the DIY lightbox.
Microfibre cloths and cotton gloves — keep jewelry pristine between shots.
Acrylic risers (optional) — create floating-effect displays for Instagram content.
Total estimated cost: under $60 USD.
Common Mistakes to Avoid
1. Leaving fingerprints on the jewelry. One smudge on a polished ring surface is clearly visible in a macro shot and takes significant editing time to remove. Clean the piece and use gloves.
2. Using digital zoom. It destroys resolution. Get physically closer instead.
3. Shooting in JPEG when ProRAW is available. ProRAW files give you dramatically more editing latitude — especially for recovering highlights on polished metals.
4. Using the flash. It creates reflections and flattens texture. Never use the built-in flash for jewelry.
5. Not locking AE/AF. Exposure drift between shots in a series creates inconsistency. Always lock before shooting.
6. Ignoring the iPhone’s reflection in shiny surfaces. At close range, polished metals can pick up the rectangular shape of the iPhone lens. Adjust the angle of the piece or your shooting position slightly to eliminate this before shooting.
Final Words
Taking stunning jewelry photos with your iPhone comes down to three things: clean preparation, smart lighting, and the right camera settings. You don’t need a professional studio — a $60 DIY setup and a few native iPhone features can produce marketplace-ready shots that genuinely sell. Master the process once, and every piece you photograph will look as valuable as it truly is.
Frequently Asked Questions
Which iPhone is best for jewelry photography?
Any iPhone 13 Pro or later gives you the best results thanks to Macro Mode and ProRAW. For standard (non-Pro) iPhones, a clip-on macro lens brings performance close to Pro level at a fraction of the cost.
Do I need a lightbox to take good jewelry photos?
No — a large window with diffused natural light is often superior to a DIY lightbox. A lightbox is most useful when natural light is inconsistent or unavailable, and when you need repeatable, consistent lighting across a large product catalogue.
Why does my jewelry look yellow or grey in photos?
This is a white balance issue. The iPhone’s automatic white balance can be fooled by mixed light sources. Use Halide to set white balance manually in Kelvin (approximately 5500K for daylight, 3200K for tungsten lamps) or correct it in Lightroom Mobile after shooting using the Temperature slider.
How do I avoid capturing the iPhone reflection in shiny jewelry?
Angle the piece slightly (a 5–10 degree tilt away from the lens is usually enough) until the reflection disappears from your frame. Shooting with a DIY lightbox also reduces lens reflections because the jewelry is surrounded by white panels rather than open space.
Can I sell jewelry on Etsy using only iPhone photos?
Yes — many successful Etsy sellers use only iPhone photos. The quality of iPhone cameras, combined with proper lighting, correct settings, and editing, is more than sufficient for marketplace listings.