
Furniture is a big product that has to look exact. A sofa is sold on its fabric, a table on its grain, a chair on its legs and joints. Customers zoom into all of it, and then measure their room. So a furniture photo that looks lovely but changes the product is worse than a plain one.
The AI prompts for furniture product photos below are written the way a retoucher would brief the job: naming the material, the finish and what must not change, instead of asking for “a beautiful living room”. Copy any of them into ChatGPT, Gemini, Midjourney or the AI editor in your product-photo tool, upload your own shot, and you will get much closer than a one-line request will.
Please read this before you scroll: the images in this article are not AI output.
Every before and after on this page is real client work, retouched by hand by the team at Pixel Retouching. We have used our own portfolio deliberately, because we would rather show you the standard these prompts are aiming at than show you a set of AI attempts and call them finished.
So treat the sliders as the target, not as a promise. A good prompt will get a straightforward piece surprisingly close to what you see here. It will not get a difficult one all the way there, and the note under each prompt tells you where the gap usually opens up.
Three rules before you start
Upload your piece; do not ask for one. These are editing prompts. A model asked to generate an oak sideboard will give you a handsome sideboard that does not exist, with handles, proportions and grain that are not yours.
Name the material and finish. “Wood” covers oak, walnut, ash and veneer, in matte, satin or gloss. “Fabric” covers linen, velvet, bouclé and leather. The more precisely you name it, the less the model invents.
Check proportions against the real piece. Models stretch and straighten furniture to make it look tidier. A sofa that looks 20 cm longer than it is will come back as a return.
1. A chair cut out to pure white
 n
n Beforen Aftern
n n
n
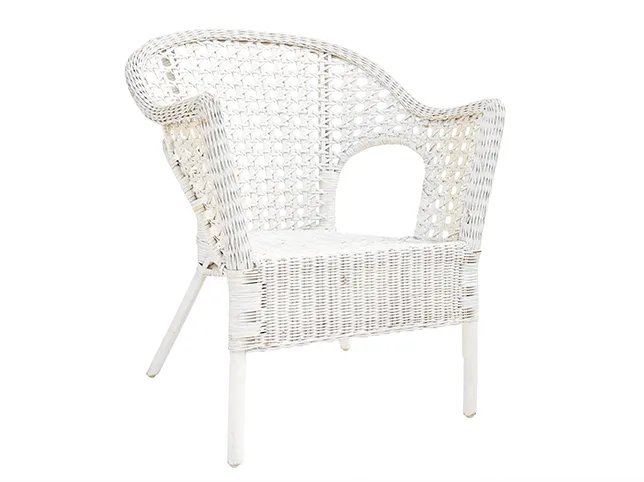
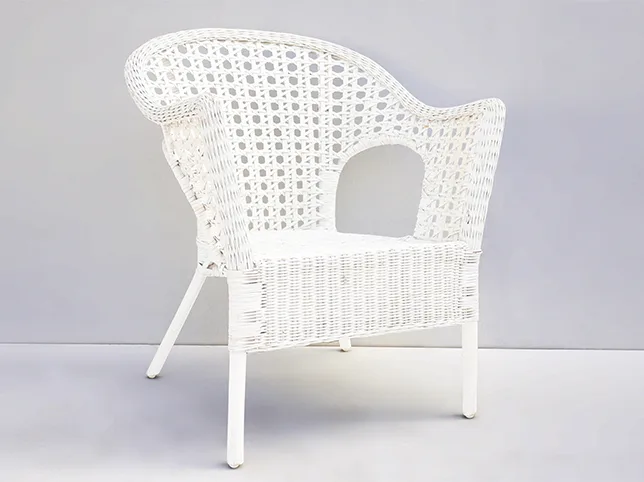
Rattan chair retouching. The weave is the product, so every gap has to stay open.
n
Cut this rattan chair out onto a pure white background, RGB 255, 255, 255. Keep every gap in the weave open, so the white shows through where it does in real life. Do not fill, smooth or redraw the weave pattern. Remove dust and small marks. Add a soft, natural contact shadow under each leg only.
What to watch for: filled gaps. Open weaves, slatted backs and spindles are where AI cut-outs fail first. The gaps get filled with grey, or the weave is redrawn in a neater pattern that isn’t yours.
2. A sculptural piece with curves
 n
n Beforen Aftern
n n
n
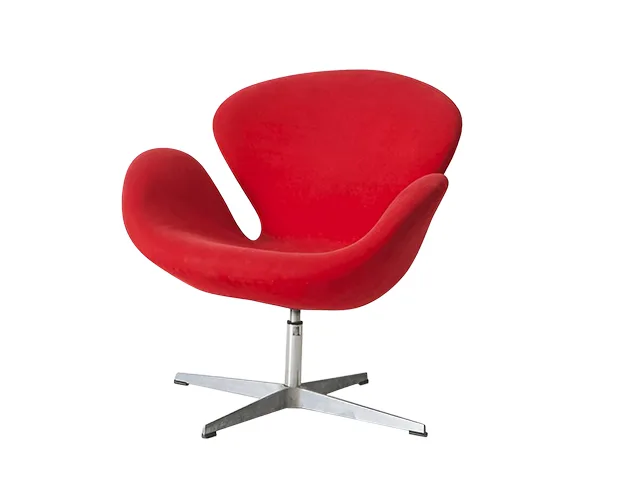
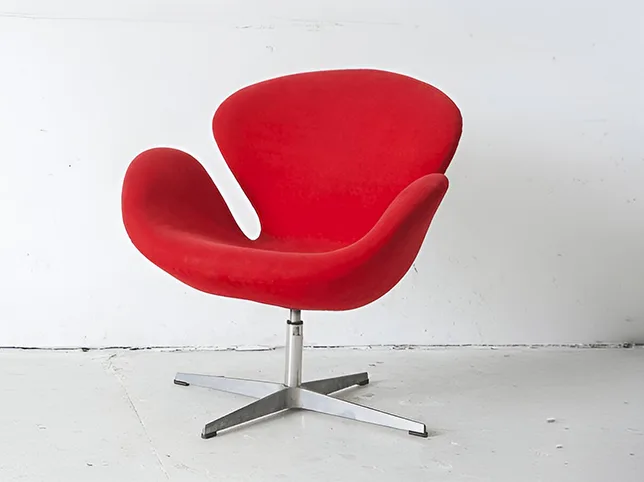
Swan chair retouching. Curves need soft, even light, not a new shape.
n
Retouch this upholstered chair for a product page. Keep its exact shape and curves; do not straighten, slim or round off any edge. Even out the lighting across the fabric so the colour looks the same from top to bottom. Remove lint, dust and small creases. Pure white background with a soft shadow under the base.
What to watch for: a reshaped silhouette. Models “improve” curves to look more symmetrical. If the arms or the back look different from the original, the edit has gone too far.
3. Wood grain that must stay real
Retouch this oak dining table. Keep the wood grain exactly as photographed; do not smooth, repeat or redraw it. Remove dust, fingerprints and small light scratches from the tabletop. Reduce glare from the window reflection without making the finish look matte. Keep the colour of the wood true to the original.
What to watch for: repeated grain. When a model fills in a reflection, it often copies a patch of grain, and the same knot appears twice.
4. Fabric colour on a sofa
Correct the colour of this sofa fabric to match the real product: [describe the colour, for example warm sage green]. Keep the texture of the fabric visible, including the weave and the small shadows in the folds. Do not change the colour of the legs, cushion piping or background.
What to watch for: flat colour. A recolour that removes texture makes velvet look like plastic and linen look like paper. Our AI prompts for product colour accuracy go further.
5. Making colour variants from one photo
Create a version of this armchair in [colour] fabric. Change only the upholstery. Keep the wooden frame, legs, stitching, buttons, shadows and the texture of the fabric exactly as they are. Match the brightness of the new colour to how that colour would look under the same light.
What to watch for: colours that would not look like that. A dark navy and a pale cream don’t reflect light the same way. If the highlights look identical on both, the variant looks fake. Our colour change service builds variants by hand.
6. Straightening verticals
Correct the perspective in this photo of a bookcase so all vertical lines are straight and parallel. Keep the shelves level. Do not change the proportions of the bookcase; it is [height] cm tall and [width] cm wide.
What to watch for: a squashed product. Perspective correction can quietly change height and width. Giving the real size helps the model keep it.
7. Removing the studio from the floor
Remove the visible studio floor, tape marks and the edge of the backdrop from this photo of a sideboard. Replace them with a seamless pure white background. Keep a soft, realistic shadow under the sideboard so it does not look like it is floating.
What to watch for: floating furniture. A heavy piece with no shadow under its legs looks pasted on. Our AI prompts for product shadows explain how to fix it.
8. Glass and mirror surfaces
This coffee table has a glass top. Remove the reflection of the camera, lights and room from the glass, but keep a faint natural reflection so it still reads as glass. Keep the base visible through the glass exactly as photographed.
What to watch for: disappearing glass. Clean it too much and the top seems to vanish, so the table looks like a frame with nothing on it.
9. Leather and its natural marks
Retouch this leather sofa. Remove dust, lint and handling marks. Keep the natural grain, creases at the seams and the slight variation in colour that real leather has. Do not make the leather look glossy, plastic or perfectly uniform.
What to watch for: vinyl leather. Full-grain leather has character. Smooth it all away and it looks like the cheapest option.
10. Placing a piece in a room
Place this exact sofa in a bright Scandinavian living room with light oak floors, white walls and soft daylight from a window on the left. Keep the sofa completely unchanged: shape, size, fabric, colour, legs and cushions. Scale the room so the sofa looks [length] cm long. Match the shadows on the sofa to the window light.
What to watch for: scale. AI rooms are often sized for the look, not for reality, so a two-seater can look like a corner sofa. Customers buy furniture by size.
11. Close-up detail shots
Retouch this close-up of a drawer joint. Keep the dovetail joint, the wood grain and the hardware exactly as photographed. Remove dust and small marks only. Do not sharpen into new detail or add texture that is not in the original.
What to watch for: invented craftsmanship. Detail shots sell quality, so a joint that looks better than the real one is a promise you can’t keep.
12. A batch that has to match
Edit this photo to match the reference image I have uploaded: same white background, same brightness, same shadow softness and direction, same amount of space around the product. Do not change the product itself.
What to watch for: drift. Across 50 images, models drift a little on every one. Line them up side by side before you publish.
Where these prompts stop working
Everything above assumes a piece the model can read: a sharp shot, simple materials and clear edges. On a plain table or a solid-colour chair, a good prompt saves real time.
Furniture is also where AI runs out of road, and it is worth being specific about where:
Open structures. Rattan, cane, slats, spindles and wire frames. The gaps are the hard part, and models fill them.
Real grain and texture. Wood grain, bouclé loops and woven fabric are unique to each piece. Generated versions repeat or tidy them.
Size and proportion. Customers measure. A small change in length or height is a returns problem.
Colour variants. Each fabric reacts to light in its own way, and a model’s recolour often ignores that.
Used honestly, that is not an argument against prompting. It is the case for knowing what to prompt. Run the simple pieces through a model, and send the ones that carry the price to someone who will open the file. Our furniture image editing services exist for exactly that second group. Comparing editing tools first? See our list of furniture image editing apps.
Frequently asked questions
Are the furniture images in this article AI generated?
No. Every before and after on this page is real client work, retouched by hand by the Pixel Retouching team. They show the standard the prompts are aiming at, not results produced by the prompts.
Can AI put my furniture in a room scene?
Yes. Upload your product photo and describe the room, the light direction and the product’s real size. Check the scale and shadows carefully, because AI rooms often make furniture look bigger or smaller than it is.
Can I use AI to create colour variants of a sofa?
Yes, for previews and drafts. Ask the model to change only the upholstery and keep texture and shadows. For final listings, check that each colour looks realistic under the light, because AI recolours often get dark and light fabrics wrong.
Why does AI fill in the gaps in my chair?
Open weaves, slats and spindles are hard for AI background removal, because the background shows through many small gaps. Models tend to fill them or redraw a simpler pattern. These pieces usually need a manual cut-out.
Which AI tool is best for furniture photos?
Tools that edit an uploaded photo, such as ChatGPT, Gemini or the AI editor in your product-photo app, are best for listings. Pure generators like Midjourney are better for mood boards than for product pages.
See it on your own furniture
If you would rather judge this on your own photographs than on ours, send three images through the free trial. A retoucher edits them by hand and sends them back within 24 hours. No card, and you keep the files either way, including any you have already run through a prompt, which is the fastest way to see the difference side by side.
More prompt libraries
- 9 AI Prompts for Shopify and Etsy Product Photos
- 14 AI Prompts for Product Shadows and Reflections
- 13 AI Prompts for Product Colour Accuracy and Colourways
- 12 AI Prompts for Amazon Main Images (Copy & Paste)
- 11 AI Prompts for Background Removal and White Backgrounds
- 18 AI Prompts for Jewellery Product Photos (Copy & Paste)
- 15 AI Prompts for Ghost Mannequin Photos (Copy & Paste)
- 10 Best AI Prompts for Clothing Product Photos (Copy & Paste)